Saturday, April 14, 2012

Glory work! Fingerboards and Inlays at last.

I have been looking forward to seeing the necks take on their final "facial" appearance, and I'm pleased with the results.

First I needed to sand the excess neck maple away from the headstock bindings. To do this, I made a sanding jig the exact radius of the concave sides, and spray mounted successively finer sandpaper to it. If I hadn't done it this laborious way,  I'm sure the curve would never have been just right, and this would be really obvious to the hand and eye.
Sanding the other headstock side curves was easier, using a drill press sanding tool with a few grits of paper. That's a vac on the left, keeping the room just a little less messy.

Well, I had a heartbreak here, but it's going to be OK. My drill press quill has gotten a lot of side movement in it, from using the Wagner Safe-T-Planer. So when I drilled the tuner holes from the back of the headstocks, they drifted all over the place laterally. I just about shit myself. Anyhow, I repaired the drill press, plugged the holes (with maple dowels), and redrilled them. Fortunately, the tuners have washers on the top, which cover all the visible maple except for one hole on each headstock, which I patched with a cherry or cherry burl "Dutchman."
I bought preslotted ebony fingerboards from Stewmac. They're beautiful. They come with parallel sides, and needed to be tapered, so I made a simple tablesaw jig. Here's the first cut on each.
For the second, final cut, I reversed the fingerboard in the jig, and added the offcut from the previous cut, plus a spacer.  I had to do it this way because the boards had to be tapered from each side, relative to the fret slots.  Worked fine.
I used a special caul to glue each of the fingerboards. You can't see them in this photo, but there are three alignment pins through the caul and fingerboard into the necks, to make sure the fingerboards don't slide under clamp pressure. 
I used maple and cherry for binding the sides of the fingerboards. I clamped the bindings hard against the fingerboard, then used superglue to weld the wood together. The cauls here are covered in wax paper. I use "Cut Rite" brand wax paper because the name suggests it should be used in woodworking.
I mitered the binding joints at the base. Here is one being clamped for gluing.  I left the bindings just higher than the top surface of the radiused fingerboard, so I could use it as a stable base for my mini router when inlaying.
First inlays: diamonds on my neck. I used .3mm mechanical pencil to draw alignment guides, then traced around each diamond with the pencil as I held it in position. Than I used a dental burr chucked into a Dremel Moto Tool with a router base. The black epoxy I mix will squirt up from the hole to fill those little cuts in the diamonds.
Mortises for the gold MOP inlays on Brendan's fingerboard. Same technique as the little diamonds, but a lot more ebony dust.

Here's how I made the pattern for the inlay pictures on the headstocks: First, I scanned the headstocks and inlays actual size, combined them in Photoshop, and printed them on adhesive label paper.  Then I peeled the backing off the prints, stuck the in their spot on the headstocks, and cut away the "inlay parts" with an exacto knife.
When all the pieces were cut out, I emptied my shop's pencil sharpener onto a sheet of paper and blackened my finger with the graphite, rubbing it in to the stencil. The graphite sunk onto the knife marks, leaving a clear pattern for me to cut.
The completed headstock pattern, ready for routing and cutting.
Since I wanted the best fit for these inlays, I only used the router to waste away the insides where I could. This was helpful in establishing the proper depth for the mortises. I cut the rest by hand with tiny chisels I made by sharpening jewelers screwdrivers. This was tedious.
I mixed cherry dust with epoxy to glue the 34 inlay pieces. 
I used black epoxy on the fingerboard inlays. I then let the whole thing cure for a day before sanding.
Sanding the fingerboard inlays took some time, but went very well. I purchased a 12" radius aluminum sanding block from Stewmac - the only expensive tool I bought - but it was worth every cent. I spray-mounted 60 grit paper to the block and used it to grind the shell and epoxy down to the ebony, then used 80, then 100, then 120, then 150, then 180, then 220, then 400, the 600 grit paper on the block to get a decent scratch-free surface.. 
Cutting waste wood from the sides and end of the fingerboard on the bandsaw. I taped blocks under the neck to support it during the cut,  and left a little extra next to the bindings, which will come off when I shape the necks, starting Monday.
Here are the necks in their present shape, ready for shaping, fretting, and attaching to the bodies.
Finished headstock inlays. You can see the patches over the two ill-drilled holes, which won't be noticed after the tuners and their washers are installed.


Sunday, April 1, 2012

Making the necks, Part 1: Roughing it all out.

The bodies are "done," pending final sanding and a little more scraping. So it's on to the necks. Can't say the finish line is in sight yet, but it's nice to cut some lumber again.

My son Brendan was home for a while over Spring break, before flying off to visit UC San Diego, where he'll be going to graduate school next Fall. He and I cut and assembled the basic neck laminations.

We decided to make a 3-piece hard maple laminated neck, with the three layers separated by a thin layers of Hondouras mahogany veneer. We made a basic template and cut out the six maple neck laminations, but when it came to cutting the veneer, the pieces split like crazy and were basically unmanageable.  So we made a sandwich out of scrap 1/4 ply, with four oversize pieces of veneer in the middle, and then nailed them all together with my lovely little 23 gauge pinner. Then we cut everything at once on the bandsaw, and were happy.

We squared up all the wet-glue laminations in this simple gluing jig,  then clamped the hell pit of them. The one in the foreground is dried, the one in the back almost. 
After we jointed the top surfaces  of the necks flat and square, and cutting the end piece at a 4 1/2degree angle, I couldn't put it off any longer: time to cut the neck mortise in the "finished" bodies. This router jig took a bunch of fiddling, but held the bodies tight and square while I cut the dovetail mortises as described with a nice new 14 degree bit. I had visions of some massive disatser here,  but all turned out well.
Bob Benedetto prescribes another elaborate router jig for making the dovetail tenons on the neck ends, but for the life of me I couldn't figure out why, so I went ahead and made the first (side) cuts on my router table, with the same bit I used for the body mortises. In this photo, also, the slot for the "slightly bowed" truss rod has been cut with a spiral bit on the router table. 
It wasn't until I had to make the back dovetail tenon cut along the heel of the neck that I realized why Benedetto uses a  special jig: There's no way to hold the neck flat along the now-small bottom surface and canted back at the 4 1/2 degree angle. Sooooo I sacrificed  a little meat on one of my small wood clams to make the surface bigger, and ran the whole thing through, clamp and all.  Luckily, I've got plenty of clamps, having bought out an assortment of about 50 different ones from a retiring woodworker.


My wonderful Wagner Safe-T-planer did a great job of leveling and tapering bost of the backs of the necks, and then a similar operation tapering and leveling the backs of the headstocks. 
I cut a small rabbet at the base of the top of the neck, thsn glued on the neck extensions as shown in the book. This is not a very strong joint, but it will be strengthened greatly when the fingerboard is glued in and when the neck and part of this extension is glued to the body.  One of these neck extensions did not align properly in gluing, and I had to face-glue some veneer to the front of it, then sand most of it off, to make it perfectly level with the rest of the neck top. No harm done. 
I added the headstock "ears" to make it a little wider, then cut the cavity for the truss rod end and adjuster. 
Here's the cavity at the other "head" end of the truss rod, where the the non-threaded part is. Not quite finished yet. When both end cavities were squared away, I cut and threaded the rods to size, wrapped the "slightly bowed" truss rods in a little felt, and glued a small strip of cherry over it to seal the slot.

I cut and collect burls from trees near my house.  A few years ago I cut this cherry burl, which I unwrapped (pieces had been coated with Penofin and tied back together to season) to look for a piece for one of the headstock top veneers.


These are the two headstock face veneers. On the left,  a piece of cherry veneer bandsawn from one of the burls in the photo above. On the right, a piece of cherry from some firewood with grain I admired and saved a few years ago. I wanted the two headstocks to look quite different.

Here's the current state of the necks: Headstock veneers in place, as are the thin curly cherry veneers on the back of the headstocks (beautiful stuff, left over from our kitchen cabinets). russ rods in place and snug. You can see the little veneer build-up I had to do on one of the neck extensions, but it's dead flat now.

My headstock blank on the left, Brendan's on the right. The top shape is similar to one of the Epiphone archtops. Brendan and I liked it because it's graceful and assymetrical.

Next job: fingerboards, bindings and inlays. The glam stuff.

Wednesday, March 21, 2012

Scraping the recurves: Easy but tedious.

Since the start of this project, I've been mystified and a little intimidated by "scraping the recurves" on the tops and backs. By introducing a concavity around the rims, the tops and backs are thinned, and become more resonant. I left a flat area of between 1 and 1 1/2" inches all around where this concavity would go, then hoped for the best until the past 3 days, which I spent scraping and scraping and scraping.

Truthfully, I haven't had a lot of experience with fine, thin card scrapers. I've planed and sanded and cut, but light scraping just hasn't been part of my regular woodworking routine. Especially not using a curved scraper, which I wan't even sure I could sharpen well/

But it turned out fine. I'm not sure my scraping achieved a tone like Bob Benedetto's, but the bodies are much more "alive" now to the touch. Taps are deeper and last longer.

Before I could scrape, I had to install little 1" bone pieces for the tailpiece wires to bear against. Fussy work with a sharp knife and a 1/4" chisel. When I ground down the bone to fit flush on top, the shop smelled like a dentist's office.
Scraping one of the backs. I reground a scraper iron from a tool I never use to the curve  shown on the plan, then spent three days using this tool an another "french curve" scraper, which I sharpened about a half dozen times. Each push or pull of the scraper brings up a tiny curl which I'll guess is no more than  a thousandth of an inch thick. The good news is that when the scrapers were sharp, they didn't tear out grain at the upper or lower ends, where it was completely cross-grain.  I'm a scraper fan now, but I won't underestimate the time it takes. 
While I was scraping, Spring happened, and I was able to work outdoors for most of the process. The two scrapers are shown here. I'm amazed how much wood I actually removed. 
One of the bone pieces after the recurves were in. 
With the recurves scraped in and all surfaces rough sanded fair, the bodies of the guitars are concluded, except for a big mortise in each for the neck, which I'm not going to tackle right now. In this photo, you can see the slightly wavy, asymmetrical match of the two back pieces for one of the guitars, which is going to look pretty nice, I think. On to the necks!

Thursday, March 15, 2012

Cheapskate router setup for nice wood bindings


I'm making two guitars, not starting a new career. And, let's face it, I'm pretty cheap when it comes to buying one-trick tools. But I want things to be, well, just so. So when I booked up on cutting the channels for the bindings, I was a little dismayed to find this router bit set and this router cradle as the "best" way to cut perfect channels for the wood bindings I wanted. Buy them together for $278 plus shipping.

I've been cobbling together router setups for 35 years, and I can't for the life of me understand why you would want to jack up the guitar in the air and then hang the router even higher in the air on top of that.

Here's what I did instead, with some scraps of poplar and a mix-and match of router bits and bearings on hand

Basically, I used my router table with a scrap of 13/16 poplar surrounding the bit, then taped same-thickness scraps of poplar to one side of the face I was cutting. The way, both sides would always be the same height off the router table, which means the same depth of cut.  Then, when one side was cut, I swapped the taped-on scraps to the other side and finished up. 
Ready to start the first cut. I'll admit I was nervous. I sharpened the router bit with a tiny diamond file. But I couldn't see what damage I could do, except for tearout, which I addressed by going really, really slowly around.
Closeup of the first setup.
After the first channels were cut on the tops, where there is a 2-part binding, I went around tops and backs for a second channel for the outer curly maple binding to cover the end grain of the tops and backs. Same idea, different router bit.

I was really happy with the result: clean, no-cost binding channels. Take that, Stewmac!
I found a nice 4' chunk of curly maple at woodcraft for $3, because it had a huge hole in the middle of the board. Fine with me - I just cut strips about 3/32" x about 7/16" on the tablesaw, and scraped them flat. I had to buy a new blade for the saw, though - even my mildly used 40-tooth blade caused blowouts in the grain. A new 60 tooth blade did fine, then I scraped and sanded the strips.
70 degrees out! I was able to work at my outdoor workbench for bending the bindings. What a difference bending the maple vs. bending the mahogany; curly maple falls apart if it's wet, and the mahogany doesn't bend if it's dry! In the photo, the first maple strip has been bent, and is immediately ready for installation.
Bending the second curve on a cutaway-side maple strip. The best technique proved to be slooowwwly pushing  the maple around the hot iron, dry. I used the smaller-diameter "upper level" pipe (see prior photo) for the first tight cutaway curve, then the lower-level larger pipe for everything else. No springback on this stuff at all. The little mahogany strips bent more easily, with just a little spray spritz of water which made steam.
Superglue! I went about an inch at a time, pushing the bindings in, seeping a little glue in, spraying accelerator. Took about 10 minutes a side. Tape wouldn't have drawn it in tight enough, and there was no way to clamp. The guitar bodies looked dishearteningly ugly at this point.
For the bottom joint, I overlapped set the first strip in a hair long, overlapped the second, and used a sharp 1/2" chisel to put them together. Worked well.
Thank you, Miles! A friend left his Fein Multitool here several years ago, and hasn't bothered to pick it up. This is the only time I've used it, I swear. Had to buy a new velcro pad and some Schliefblatter for it, though. Working outdoors again - less mess in the shop. I was really happy to see that superglue disappear. Next step, not shown here (my wife needed the camera at work) was two days' work scraping and sanding the sides flush again. Thorny work on the inside curves.

Bindings in place, rough sanded. Next little step, inserting the bone piece at the base of the tops where that tailpiece adjusters go, then scraping the recurve on tops and backs, which should be interesting.

Saturday, March 10, 2012

The Big Glueup: tops, sides, and backs

The guitars have gone from 2D to 3D... from parts to bodies. Yay!

Last look inside. It's sort of a shame nobody will ever see these fittings again. 
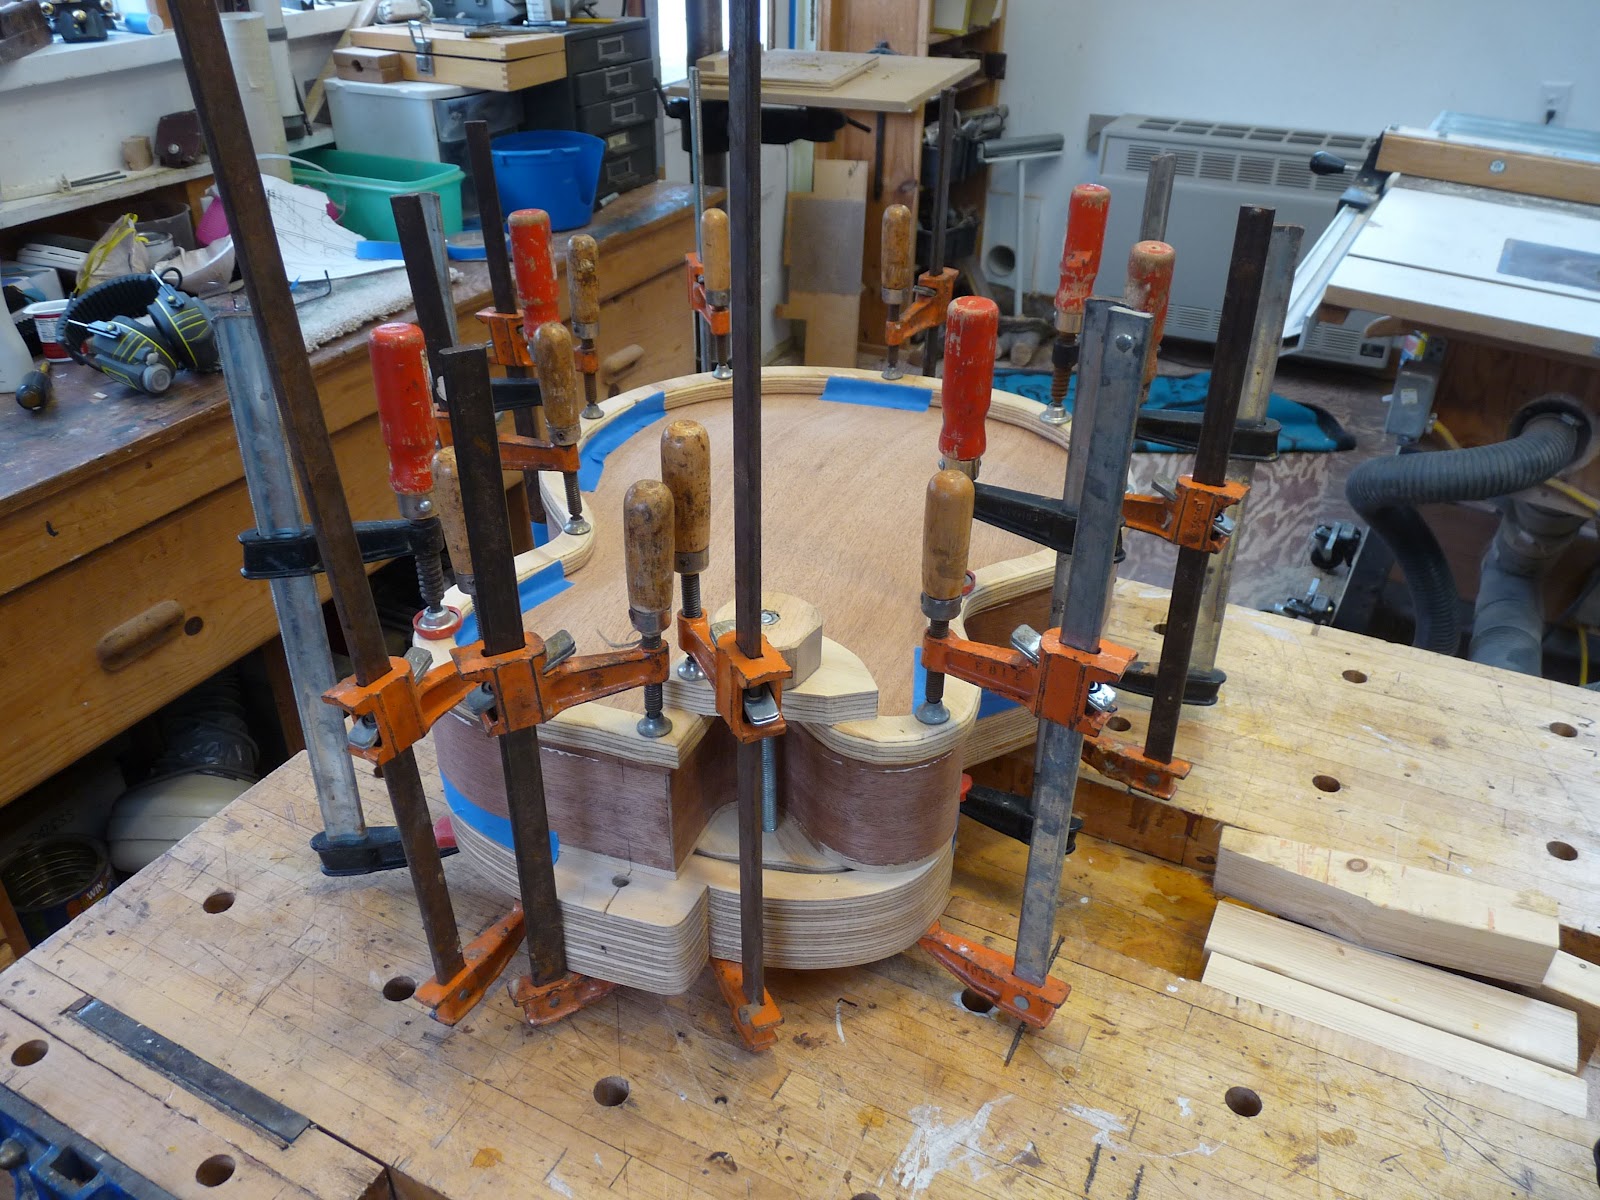
Glueup! Top, sides, backs. TRhis was pretty frantic, working quickly to get the glue spread before the "open time" expires. I use Titebond III for this, partly because the open time is a little longer than II. For this glueup, I made a special rim-wide clamping caul, which is on the top of the sandwich, and a special little clamp to pull the cutaway area together.
Cutaway clamp. Just some scraps of plywood, a 3/8 carriage bolt, and the hand nut from the original carving jig, which is the bottom part of the sandwich.
Sanding the sides flush and fair. The body on the right is done, the one on the left in progress. It was a full day's work to sand the sides. The sides themselves are only about 5/64ths to 3/32" to begon with, so I was really wary about using power tools here. I made up some wide sanding blocks of 100 and 150 grit paper, and carefully leveled the whole perimeter. There were lots of subtle "flat spots" from the side bending, which needed to be smoothed out - you'd see and feel them if you didn't. Also, the sides need to be perfect now because the next step - binding - requires a fair curve to follow. Both bodies turned out fine, although my arms were aching and my hands hurt.

Sanding the tricky part. I made several half-round sanding blocks, in different grits, to sand and fair the inside curves. Even so, it was difficult, because all the sanding had to be with the grain of the wood, although it was tempting to sort of saw away sideways in these spots.

Congratulations, Brendan! Tag inside one of the guitars. 


Monday, March 5, 2012

Blocks, stiffeners, linings: fitting out the sides for gluing

Sorry for no post in a while - but I took about 2 weeks to raise some cash by building a 17 foot wind tunnel for a friend who manufactures anemometers. I had to build and deliver it in two parts, because I couldn't fit it all in my shop. Take a look, and you'll understand.

But now I'm back on the job.

Once the sides were bent, and the linings were cut, I installed blocks, vertical stiffeners and linings to the sides, to get them ready for the big glueup. Here's how it went:

Adding neck and tail blocks. I was amazed to find I still had some 3" thick chunks of Honduras Mahogany in my shop from about 20 years ago, when I made garden furniture out of it.  I brought the chunks up here from New York.  It was perfect for making the thick neck and tail blocks, which  I glued up in the main clamp to fit the sides together.
I goofed, but it's OK. I bent one of the sides so that it fell about 1/8" short of meeting the other side in the butt joint at the top. So I had to scab in a filler piece cut off from trimming one of the other sides. Instead of just adding about 1/8" to fit, I cut a little bit more off the short side and added about a 3/4" piece to fill. BUT no problem - the "extra seam" will be invisible, hidden under the neck when it's assembled. If this is the worst mistake I make, I'll consider myself lucky.

Gluing in sections of kerfed lining to the inside edges of the sides.  By a stroke of serendipity, I had a relatively clean "indoor" job I could do upstairs in the house during evenings while the shop was in shambles from building the wind tunnel. I added vertical grained basswood stiffeners to the sides where indicated (you can see one just under the tip of the brush) and segments of kerfed lining in between. This was nice, sit-down work.
Kerfed lining sections clamped and drying. I used little spring clamps on the ends and clothespins in between. 
Adding filler strips. To make the best possible uninterrupted glue joints between the sides and the tops and backs, I added small, tapered fillers  over the vertical stiffeners, in between the strips of kerfed lining. When these were dry, I pared them down to the same profile as the linings with a sharp chisel.
Leveling the edges with a "sanding paddle." I spray-mounted sandpaper to one end of a wide flat stick, and rubbed the "sandy part" over the kerfed linings, little by little, until they were flush with the sides. Careful work, but satisfying when it was done.
Using the sanding paddle trim and level the edges. Neck block, sides, vertical stiffeners and kerfed linings all cleaned up and level!
Ready for gluing the tops and backs. Last good look at the inside.